Wednesday 29 August 2012

Nan Goldin: Gilles and Gotscho Embracing

The first time I felt a real connection with Nan Goldin's work was seeing Gilles and Gotscho Embracing, Paris 1992.  The reason is that I now see the apparently artless, 'snapshots' are actually carefully designed and posed.  There's a lot of work here, not just an opportunistic eye.
http://sexualityinart.files.wordpress.com/2008/01/gilles-dusein-and-gotscho-nan-goldin.jpg
The image depicts a tender moment; the lovers sit facing in opposite directions on a desk as on a lovers' bench.  They lean in towards each other, embracing with shoulders, necks and chins, but not arms.  Their faces are hidden.  The muscular back of the left-hand figure is modeled by (at least) two light sources.  The right-hand figure, facing camera, rests one arm on his thigh; there's a cup, complete with saucer and teaspoon, on the flat of his other hand.  Behind them, partly obscured, are two watching figures.  The lovers disregard them, confidently displaying their affection before an audience.  It's beautiful.
But the watchers overlap, their faces are blurred and flat, as if they were cardboard cut-outs.  The desk is set at an angle; there are books and papers at either end, framing the lovers.  The forearm is twisted to reveal its tattoo.  The teaspoon is perfectly placed - the cup and saucer would be incomplete, too white, without it.  Now I wonder if the lovers are kissing or laughing.
Yet it is the artifice, the careful construction of this image, that endears it to me, that makes me take more than a glance, that will make me look more carefully at her work.
My son bought me a book of Nan Goldin's images and I'd only really glanced at it.  Now I shall look.

Wednesday 8 August 2012

Exercise 6: A Portrait Sequence
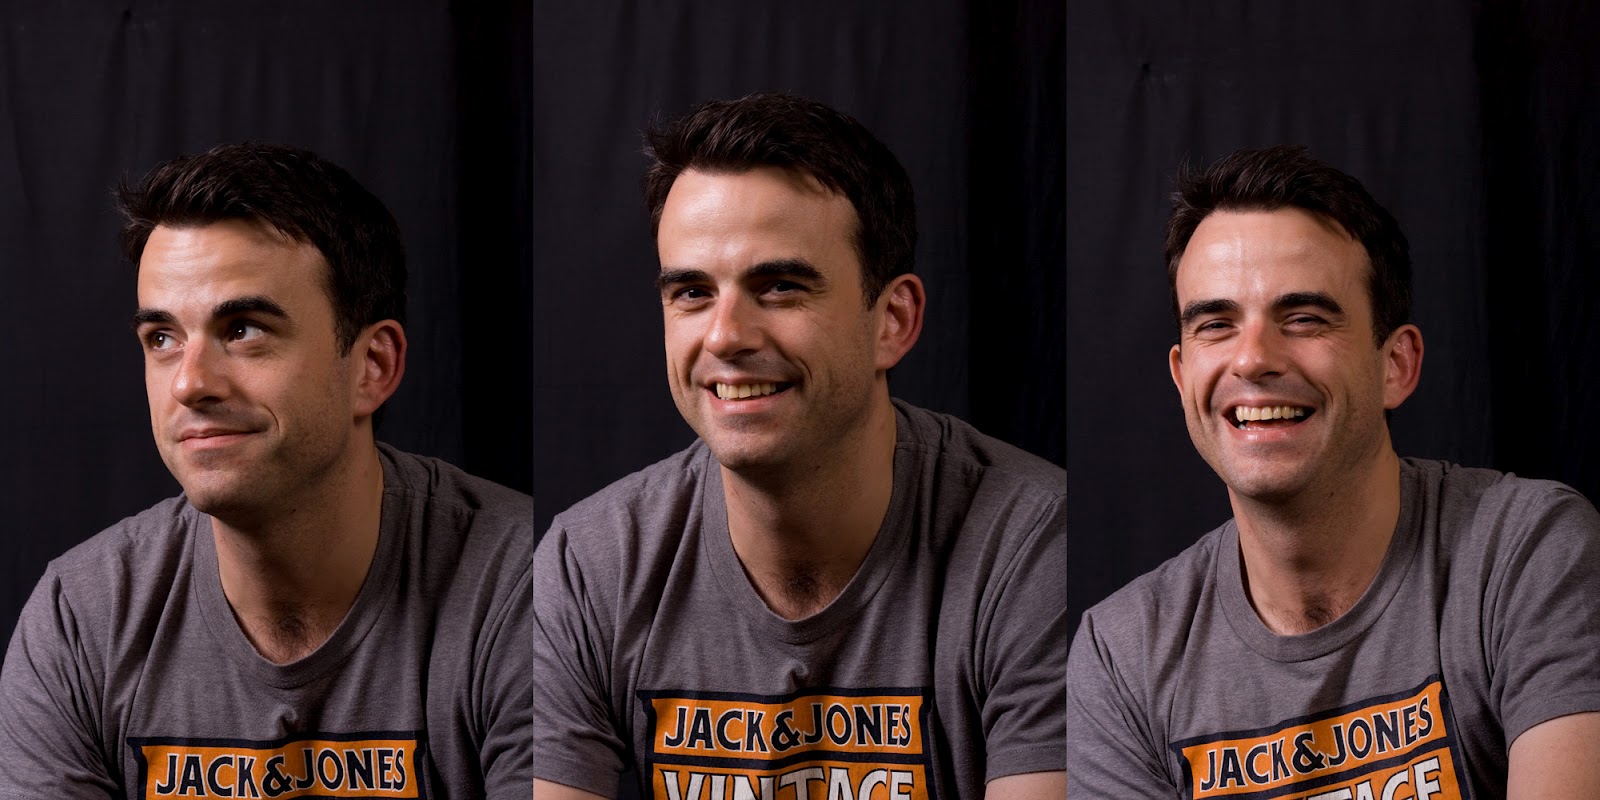
The first shot of the session.  The model is alert, unsure of what's to come.  It's up to the photographer to put him at his ease.  This is something I need to practice

Six shots and some conversation later, the model is more relaxed - so is the photographer.  This sequence shows slight rotation of the head to light the model's left cheek.  It's not easy for a model to move so little.

The next three shots; the model looking up left.  I can't remember what I said, but it seems to have worked.  With his face turned the other way, it's much lighter.

The next three; I asked him to look serious, turning slightly left, then look back with his eyes.  I think that the oblique look in the third frame makes him look suspicious - of me, or simply in general.  I was startled when I saw this in the session. 

What a difference a smile makes!  But he's not smiling with his eyes...  I saw this at the time and pointed it out; maybe this is what gave me the expression in the next image...

I knew this was the one.  Not smiling, but looking alert and engaged.  I'd print this.  It's the only one I've done any explicit processing on.  I increased exposure by 2/3 of a stop, cropped it and did a little blemish removal.  The other photographs show how little work there was to do.

Laughter at last!  I like the middle one best; it's the point at which laughter is about to break out.  There's a pleasant tension in the anticipation.

The last exposure.  I was concerned that he might be needed on stage for the play rehearsal I'd borrowed him from.  He was quite prepared to carry on.  But I was tired; I'd made over 100 exposures in the evening, 27 of them with this model, and thought I'd got the one I wanted.  Though I'm not sure he won't prefer this one.
Technical:
Key light with softbox is on model's right; fill light with umbrella to his left.
ISO200, 1/200, f14, White Balance=Flash, about 80mm on 1.6 factor sensor, say 105mm in old money. Camera hand-held. I intend to try a session with it on the tripod, using a remote, but can see a problem straight away: getting the model to look into the camera when required.

Sunday 5 August 2012

Exercise 5: Eye Contact and Expression

 It's important to maintain rapport with the model, which is difficult to do while fiddling with the camera.  You need to get everything set up first.  Using studio flash, I set to manual: 1/200th, being the flash synchronisation speed.  Match aperture and flash power to get the exposure.  Most of these were at f14.  This arrangement is completely the opposite to what I use when shooting portraits out of the studio: aperture priority with a wide aperture to blur the background.  In the studio, everything including the background should be under control.  With the flash power available I can have a small aperture and plenty of depth of field, so a crisp image is usually obtained.  If required, it can be degraded in the computer.  The camera was hand-held.  If it were on a tripod then a bit of focus latitude would help keep the all-important eyes in focus.
Something I didn't do with these was to set the White Balance on the camera to Flash instead of Auto, and I think this accounts for the colour variations.

The inclination of the head here is attractive; the model looks engaged.  Could have done with a little more light on her right eye.

That's better.  The slight rotation of the head has given me the light I wanted.  While it's difficult for the model to make millimetric adjustments of position, it's quicker than lugging the lighting gear about.

I've included this one to contrast with the next:

I much prefer this very similar shot: The arm's not in front of the model; the cheek's not distorted by the hand; there's more modelling on the face; but most of all, the eyes are slightly more open, which gives a subtle but important change of expression.  This is the picture I'd have on my desk!

Rapport is important.  As Kurt Vonnegut said, "If you can still laugh, then all is not lost."

Saturday 4 August 2012

Exercise 4: An Active Portrait


I take a lot of photographs of actors at rehearsal.


They're always focussed on what they're doing, even when they're not speaking lines.


     I'm very fond of this image, perhaps
     because of the movement blur. 
     It shows she's moving quickly, acting.
But this is my favourite. Again, she's not speaking, but responding to another actor.
And this is a special, subtle kind of activity: acting
 .

Exercise 3: Experimenting with Light

1. This shot was taken outside, mid-morning, on a cloudy day, so the light is diffuse and the shadows soft.  It's so bright that the model's eyes are part-closed and hidden in the shadow of her brows.  Fill-in flash or a reflector beneath the face would have improved this.  Her glasses have darkened, but reflections have been avoided.  There's a degree of modelling: brows, cheeks and chin stand out, as do the lovely dimples!

2. In a conservatory, mid-afternoon, on a clear day.  The light is diffused through the plastic roof, but the shadows are stronger. Light coming from the side illuminates the eyes and gives a more natural look.  The warmer white balance is attractive.

3. Fluorescent lighting overhead and in the display cases.  The soft shadows provide modelling, but the overhead lighting over-accentuates the nose.  The distorted view through the spectacle lens adds interest.  Could have done with fill-in flash or a reflector to lighten the shadows.

4. Very diffuse fluorescent lighting casts shadow under the chin, but modelling on the face is reduced.

5. Natural light diffused by a net curtain, plus fill-in flash from the camera.  Balancing the two sources is tricky; the flash falls off with the square of distance, yet the sunlight is constant.  The flash has illuminated the face and provided attractive catch-lights on the eyes (and spectacles, which is less welcome.)

6. Studio flash on both sides, providing some modelling without dark shadows, except under the chin.  The shine off the skin is unwanted.  Wish I'd straightened that necklace!

Image 6 should have been the best, because there I had total control over the lighting, yet it seems flat and dull to me.  The catch-lights show she's staring into the light.  More thought and care should have gone into it.
My favourite is number 5, the head is three-dimensional; the catch-lights are subtle.  The enthusiasm of the model helps a good deal; she seems to be looking with interest at something, rather than directing her eyes where the photographer requires.
To pursue this set-up further, I'd like to get a reflector - and an assistant to hold it.

Caerleon

I spent a week at the Writers' Holiday at Caerleon: lots of talks, fun, late nights and early mornings.  And not much work on my photographic course!.  The photographs that form this mosaic were taken in the early morning on the dewy lawns in front of the mainUniversity building at the Caerleon campus of the University of Newport.
Now that's over I intend to get down to my OCA studies.